Prerequisites and Context
Before diving into the End-to-End CI/CD setup, let’s establish the groundwork. This methodology is designed to work seamlessly in a local WSL (Windows Subsystem for Linux) environment. While perfect for testing and development, you can easily scale this approach to a production-level setup by leveraging Linux servers from your preferred cloud provider.
Here’s a quick overview of the prerequisites:
- Local Environment: We’re working on a WSL environment, but the steps are adaptable for cloud-hosted Linux servers for production deployment.
- SonarQube for Code Quality: A Docker container running SonarQube is used to analyze the quality and security of the code during the CI process.
- Trivy for Vulnerability Scanning: Trivy, a security scanner for container images, is installed on the VM with necessary permissions to ensure the security of your deployment.
- Terraform for Infrastructure Automation: Terraform is installed on the VM, ready to automate Azure resource provisioning. Ensure your setup includes the necessary permissions to access your Azure environment.
- Encrypted Credentials: The Terraform repository for this setup includes three essential files:
main.tf: Defines the infrastructure resources.variables.tf: Specifies configurable variables for the deployment.terraform.tfvars: Stores sensitive credentials, encrypted using GPG to enhance security.
If your Terraform code doesn’t follow this exact structure or methodology, you’ll need to tweak the Jenkins pipeline accordingly. The encrypted credentials approach ensures your secrets are protected while allowing the pipeline to securely deploy the infrastructure.
With these prerequisites in place, we’re ready to build a pipeline that brings together code quality, security, and deployment automation into a single streamlined workflow.
Step 1: Setting the Foundation with GitHub
Every successful CI/CD pipeline begins with a well-organized source code repository. For this setup, our web application’s source code will live in a GitHub repository—a reliable and developer-friendly platform for managing code.
With your code now on GitHub, it’s not just stored—it’s primed for action. This repository will serve as the starting point for automating builds, tests, and deployments, setting the stage for the CI/CD pipeline magic that lies ahead.
Step 2: Installing Tools and Setting Up Prerequisites
To build a seamless CI/CD pipeline, it’s essential to have all the required tools and plugins in place. Here’s a step-by-step guide to installing and configuring everything you’ll need in your local WSL environment.
1. Install Jenkins
Begin by installing Jenkins, the heart of our CI/CD setup:
#Installation script for java(Java is required to run Jenkins)
sudo apt update
sudo apt install fontconfig openjdk-17-jre
java -version

#Installation script for Jenkins
sudo wget -O /usr/share/keyrings/jenkins-keyring.asc \
  https://pkg.jenkins.io/debian-stable/jenkins.io-2023.key
echo "deb [signed-by=/usr/share/keyrings/jenkins-keyring.asc]" \
  https://pkg.jenkins.io/debian-stable binary/ | sudo tee \
  /etc/apt/sources.list.d/jenkins.list > /dev/null
sudo apt-get update
sudo apt-get install jenkins
Access Jenkins via http://localhost:8080 and follow the setup wizard. Use the initial admin password from /var/lib/jenkins/secrets/initialAdminPassword to log in.
2. Install Required Jenkins Plugins
To support Terraform, Docker, and security scanning, install these plugins:
- Aqua Security Scanner
- Docker(API, Commons Plugin, Pipeline)
- Eclipse Temurin Installer Plugin (To install different tools like node/jdk etc)
- SonarQube Scanner
- Azure
- Git
- All the Default plugins while jenkins Installation
Install them via Manage Jenkins > Plugin Manager > Available Plugins
3. Set Up Docker and SonarQube
Install Docker:
#Installation Script for Docker
sudo apt-get update
sudo apt-get install ca-certificates curl
sudo install -m 0755 -d /etc/apt/keyrings
sudo curl -fsSL https://download.docker.com/linux/ubuntu/gpg -o /etc/apt/keyrings/docker.asc
sudo chmod a+r /etc/apt/keyrings/docker.asc

echo \
  "deb [arch=$(dpkg --print-architecture) signed-by=/etc/apt/keyrings/docker.asc] https://download.docker.com/linux/ubuntu \
  $(. /etc/os-release && echo "$VERSION_CODENAME") stable" | \
  sudo tee /etc/apt/sources.list.d/docker.list > /dev/null
sudo apt-get update

sudo apt-get install docker-ce docker-ce-cli containerd.io docker-buildx-plugin docker-compose-plugin -y

#Run this command to give permission to use docker for current user (Optional)
sudo usermod -a -G docker $USER
sudo chmod 666 /var/run/docker.sock
Run SonarQube in a Docker container:
#Once Docker is installed you can run docker run command as below and get SQ running
docker run -it -d -v sonarqube_data:/opt/sonarqube/data \
-v sonarqube_extensions:/opt/sonarqube/extensions \
-v sonarqube_logs:/opt/sonarqube/logs \
-p 9000:9000 sonarqube:lts-community
The command written in blue is used to run a docker container using volumes you can omit the blue line if you don’t want persistency in your SQ container
Access SonarQube at http://localhost:9000 and set up an admin account.
Default Username & Pass : admin
4. Install Trivy for Security Scanning
Install Trivy for vulnerability scanning:
#Installation script for Trivy
sudo apt-get install wget gnupg
wget -qO - https://aquasecurity.github.io/trivy-repo/deb/public.key | gpg --dearmor | sudo tee /usr/share/keyrings/trivy.gpg > /dev/null
echo "deb [signed-by=/usr/share/keyrings/trivy.gpg] https://aquasecurity.github.io/trivy-repo/deb generic main" | sudo tee -a /etc/apt/sources.list.d/trivy.list
sudo apt-get update
sudo apt-get install trivy
5. Install Terraform
Install Terraform for infrastructure management:
#Installation script for Terraform
sudo apt-get update && sudo apt-get install -y gnupg software-properties-common
wget -O- https://apt.releases.hashicorp.com/gpg | \
gpg --dearmor | \
sudo tee /usr/share/keyrings/hashicorp-archive-keyring.gpg > /dev/null

gpg --no-default-keyring \
--keyring /usr/share/keyrings/hashicorp-archive-keyring.gpg \
--fingerprint

echo "deb [signed-by=/usr/share/keyrings/hashicorp-archive-keyring.gpg] \
https://apt.releases.hashicorp.com $(lsb_release -cs) main" | \
sudo tee /etc/apt/sources.list.d/hashicorp.list

sudo apt update
sudo apt-get install terraform
6. Configure Encrypted Credentials for Terraform
Click on this to learn about this more
Step 3: Understanding the Jenkinsfile (Pipeline 1 – CI )
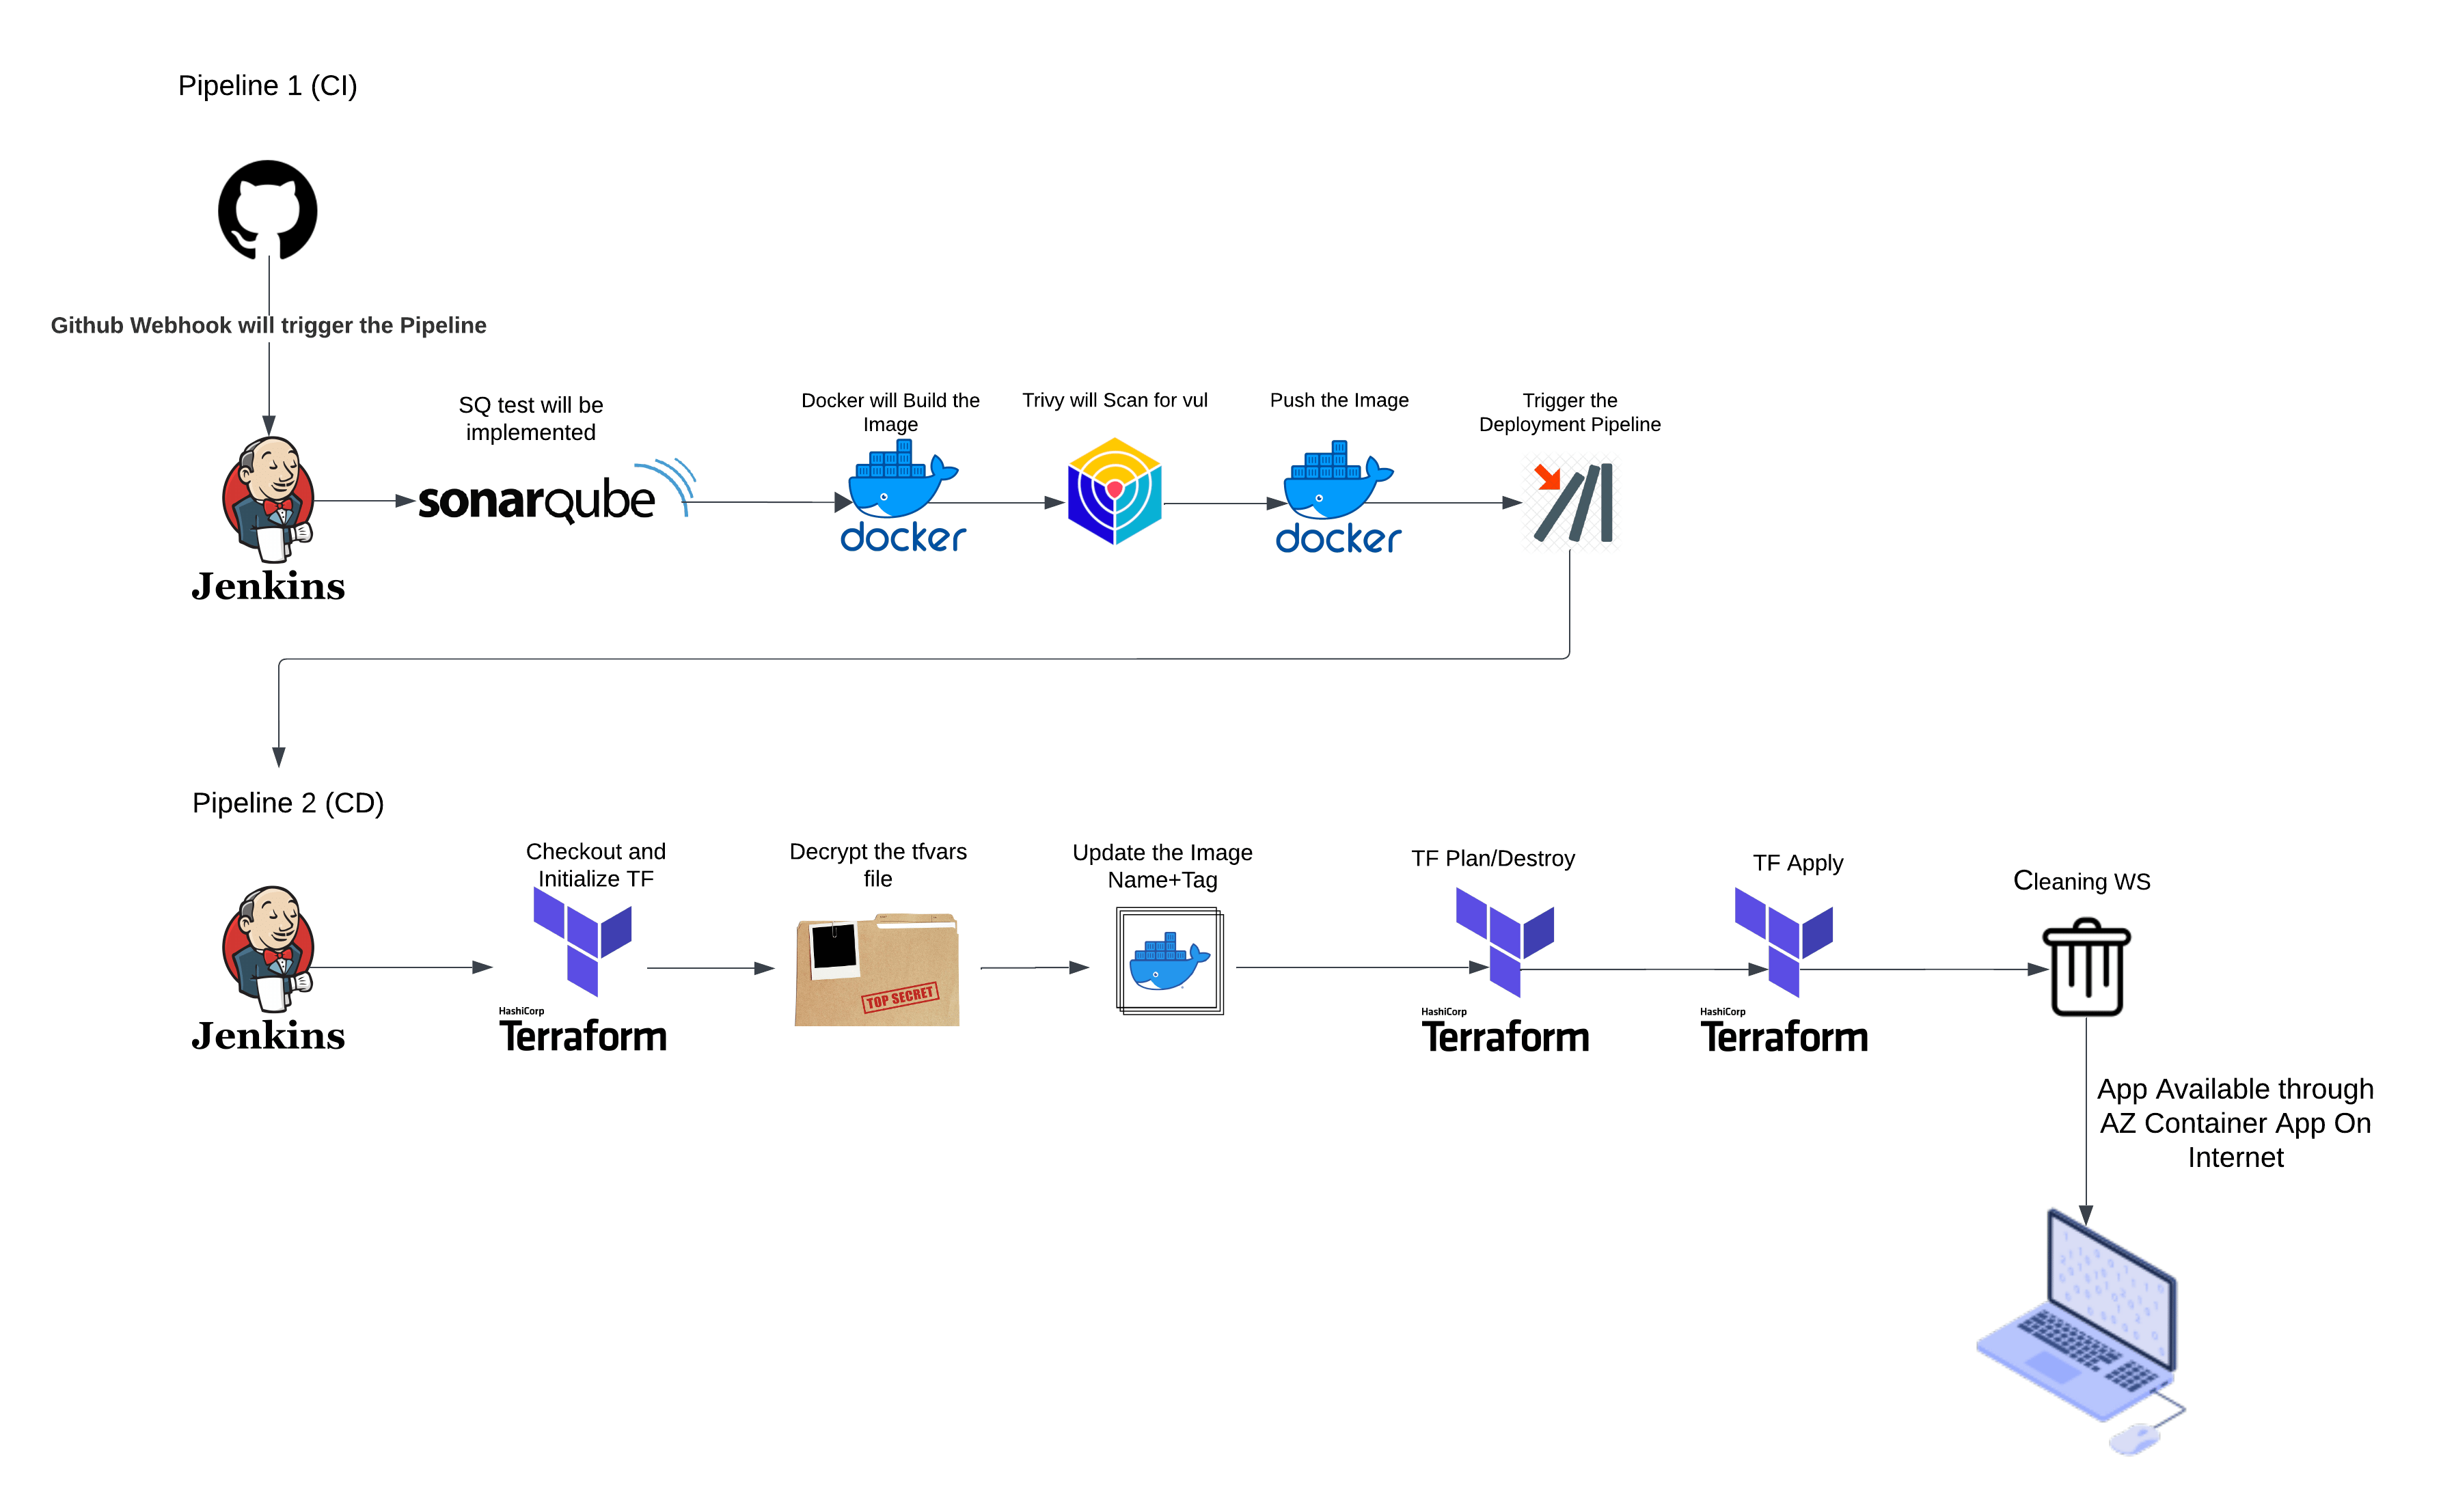
The Jenkinsfile is the heart of your pipeline, defining every stage and action in a declarative syntax. Let’s break down this Jenkinsfile step by step to understand its purpose and functionality.
pipeline {
    agent any
    tools{
        jdk 'jdk17'
        nodejs 'node16'
    }
    environment {
        APP_NAME = "azurecontapp"
        RELEASE = "1.0.0"
        DOCKER_USER = "dockeruser"
        DOCKER_PASS = 'dockerhub'
        IMAGE_NAME = "${DOCKER_USER}" + "/" + "${APP_NAME}"
        IMAGE_TAG = "${RELEASE}-${BUILD_NUMBER}"
        JENKINS_API_TOKEN = credentials('JENKINS_API_TOKEN')
        SCANNER_HOME=tool 'sonar-scanner'
        BUILD_STATUS = "${BUILD_STATUS}"
    }
    stages {
        stage("Sonarqube Analysis") {
            steps {
                script {
                    withSonarQubeEnv('sonar-scanner') {
                        sh ''' $SCANNER_HOME/bin/sonar-scanner -Dsonar.projectName=devops \
                    -Dsonar.projectKey=devops '''
                    }
                }
            }

        }
        stage("Build Docker Image") {
            steps {
                script {
                    docker.withRegistry('',DOCKER_PASS) {
                        docker_image = docker.build "${IMAGE_NAME}"
                    }
                }
            }

        }
        stage ('Trivy Scanning') {
            steps {
                script {
                    sh "trivy --output ${WORKSPACE}/reportstrivy/trivyreports\$(date +%Y%m%d_%H%M%S).txt image ${IMAGE_NAME}"
                }
            }
        }
        stage("Push Docker Image") {
            steps {
                script {
                    docker.withRegistry('',DOCKER_PASS) {
                        docker_image.push("${IMAGE_TAG}")
                        docker_image.push('latest')
                    }
                }
            }

        }


        stage ('Cleanup Artifacts') {
            steps {
                script {
                    sh "docker rmi ${IMAGE_NAME}:${IMAGE_TAG}"
                    sh "docker rmi ${IMAGE_NAME}:latest"
                }
            }
        }

    }
    post {
        success {
            echo 'Triggering the PRE_PROD Pipeline'
            sleep 5
            sh "curl -v -k --user admin:${JENKINS_API_TOKEN} -X POST -H 'cache-control: no-cache' -H 'content-type: application/x-www-form-urlencoded' --data 'IMAGE_TAG=${IMAGE_TAG}' 'http://localhost:8080/job/tftest/buildWithParameters?token=gitops-token'"

        }
    }

}
End-to-end CI/CD Pipeline Overview
- Agent and Tools Setup:
agent any: This tells Jenkins to run the pipeline on any available agent.tools: Specifies the required tools, such as JDK 17 and Node.js 16, ensuring the environment is set up correctly for the tasks.
- Environment Variables:
- Variables like
APP_NAME,DOCKER_USER,IMAGE_NAME, andIMAGE_TAGhelp manage application and container details dynamically. - Credentials such as
JENKINS_API_TOKENandDOCKER_PASSare securely fetched using Jenkins credentials. - The
SCANNER_HOMEpoints to the SonarQube scanner tool for code quality analysis.
- Variables like
Stages
1. SonarQube Analysis
- This stage runs a code quality analysis using SonarQube.
- The
withSonarQubeEnvblock ensures SonarQube environment variables are available. - The scanner is invoked with project details like
projectNameandprojectKey.

2. Build Docker Image
- Jenkins uses Docker to build an image for the web application.
- The image is tagged with the dynamic
IMAGE_NAMEand built in the workspace.

3. Trivy Scanning
- Security scanning for vulnerabilities is done using Trivy.
- Reports are saved in the workspace with a timestamped filename for traceability.

4. Push Docker Image
- The Docker image is pushed to a container registry (Docker Hub in this case).
- Both a versioned tag and the
latesttag are pushed for flexibility.

5. Cleanup Artifacts
- Docker images are removed from the build environment to save space.
- This step ensures the workspace remains clean after the build.

Post Actions
- On pipeline success, a
curlcommand triggers another Jenkins pipeline (PRE_PROD Pipeline) using the built image. - Parameters like
IMAGE_TAGare passed to the next job for seamless integration.
Step 4 : Understanding the Jenkinsfile (Pipeline 2 – CD)
This pipeline automates Terraform workflows, such as creating or tearing down Azure infrastructure, using parameters for dynamic control. It also handles secure file decryption, updates configurations, and cleans up sensitive files post-execution.
pipeline {
    agent any
    parameters {
        choice(name: "action", choices: ['plan', 'apply', 'destroy'])
    }
    environment {
        TFVARS_PASSPHRASE = credentials('gpg-passphrase')
        APP_NAME = "azurecontapp"
    }
    stages {
        stage ('TF Initialising') {
            steps {
                script {
                    sh "terraform init"
                }
            }
        }
        stage ('Decrypting the tfvars File') {
            steps {
                script {
                    sh "gpg --batch --yes --passphrase $TFVARS_PASSPHRASE -d terraform.tfvars.gpg > terraform.tfvars"
                }
            }
        }
        stage ('Updating the Image Name') {
            steps {
                script {
                    sh """
                    sed -i 's|^image_name = \".*\"|image_name = \"dockeruser/${APP_NAME}:${IMAGE_TAG}\"|' terraform.tfvars
                    """
                }
            }
        }
        stage ('TF Plan') {
            steps {
                script {
                    if (params.action == 'plan') {
                        sh "terraform plan"
                    }
                }
            }
        }
        stage ('TF Apply') {
            steps {
                script {
                    if (params.action == 'apply') {
                        sh "terraform plan"
                        sh "terraform apply -auto-approve"
                    }
                }
            }
        }
        stage ('TF Destroy') {
            steps {
                script {
                    if (params.action == 'destroy') {
                        sh "terraform destroy -auto-approve"
                    }
                }
            }
        }
        stage ('Removing the tfvars File') {
            steps {
                script {
                    sh "rm -rf terraform.tfvars"
                }
            }
        }
    }
    post {
        always {
            cleanWs()
        }
    }
}
End to End CI/CD Pipeline Overview
- Agent: Runs the pipeline on any available Jenkins agent.
- Parameters: Introduces a dropdown for
action, allowing users to choose betweenplananddestroy. - Environment Variables:
TFVARS_PASSPHRASE: Securely fetches the passphrase for decrypting Terraform variables.APP_NAME: Name of the application, reused for dynamic image updates.
Stages Explained
1. Terraform Initialization
Prepares the Terraform working directory by downloading provider plugins and configuring the backend. Ensures the environment is ready for infrastructure actions.

2. Decrypting the Terraform Variables
- Decrypts the encrypted
terraform.tfvars.gpgfile to retrieve sensitive variables like service principal credentials. - Uses GPG for secure decryption with the passphrase fetched from Jenkins credentials.

3. Updating the Image Name
Dynamically updates the image_name variable in terraform.tfvars to use the latest Docker image built in the previous pipeline.Uses the sed command for inline editing of the file.

4. Executing Terraform Actions
Executes the Terraform command specified by the action parameter:
plan: Shows proposed changes without making them.destroy: Tears down the infrastructure.Apply: Applies the Plan and creates infrastructure
Offers flexibility to choose the operation at runtime.

5. Cleanup Sensitive Files
Deletes the decrypted terraform.tfvars file after its use to ensure no sensitive information remains.

Post Actions
We clean up the workspace, removing all temporary files and directories after the pipeline execution.
With our End to End CI/CD pipelines explained and configured, the final step of deploying your application to Azure Container Apps is already in motion. Once the Terraform apply stage completes, the infrastructure is created or updated in Azure, and your web application is live on a scalable, containerized platform.
This process reflects the power of combining Jenkins, Terraform, and Azure to automate infrastructure and application deployments. The seamless integration of tools and techniques ensures:
- End-to-End CI/CD Automation: Automate every step of the CI/CD process, from code commits to live application deployment, ensuring efficiency and consistency.
- Security Best Practices: We encrypt sensitive data, decrypt it only when needed, and remove it after use.
- Dynamic and Scalable Infrastructure: Azure Container Apps offer automatic scaling, managing your app’s needs without manual intervention.


